Notice
Recent Posts
Recent Comments
Link
| 일 | 월 | 화 | 수 | 목 | 금 | 토 |
|---|---|---|---|---|---|---|
| 1 | 2 | 3 | 4 | 5 | 6 | |
| 7 | 8 | 9 | 10 | 11 | 12 | 13 |
| 14 | 15 | 16 | 17 | 18 | 19 | 20 |
| 21 | 22 | 23 | 24 | 25 | 26 | 27 |
| 28 | 29 | 30 | 31 |
Tags
- IN
- 덴드로그램
- list
- matplotlib
- Dictionary
- 최솟값
- count()
- 최댓값
- append()
- hierarchical_clustering
- sklearn
- numpy
- 분류 결과표
- dendrogram
- data
- nan
- len()
- string
- del
- insert()
- Machine Learning
- elbow method
- 반복문
- pandas
- DataFrame
- analizer
- function
- DataAccess
- wcss
- Python
Archives
- Today
- Total
개발공부
[Android] Retrofit2 라이브러리를 이용한 POST로 API 호출하여 처리하는 방법 본문
retrofit2 라이브러리 사용하기 전
기본적인 설정 방법은 아래 링크에 있습니다.
[Android] Retrofit2 라이브러리 사용을 위한 설정 방법
build.gradle 아래 코드를 추가합니다. dependencies { implementation 'com.squareup.retrofit2:retrofit:2.9.0' implementation 'com.squareup.retrofit2:converter-gson:2.9.0' implementation("com.squareup.o..
mscha.tistory.com
저는 POST 메소드로 api의 body에 아래와 같은식으로 데이터를 주면
{
    "email": "test9@naver.com",
    "password": "1234",
    "nickname": "김동주"
}
아래와 같은 식으로 결과가 나오는 api를 가지고 테스트 해보겠습니다.
{
    "result": "success",
    "access_token": "eyJ0eXAiOiJKV1QiLCJhbGciOiJIUzI1NiJ9.eyJmcmVzaCI6ZmFsc2UsImlhdCI6MTY1ODM4NzA0NiwianRpIjoiNGVmNGNiMGQtNTVjMC00MjVlLWI4YzYtNzg1N2RjYWFiNWQxIiwidHlwZSI6ImFjY2VzcyIsInN1YiI6MTAsIm5iZiI6MTY1ODM4NzA0Nn0.YVCP9wcN1rnNh_4OUTNnT4-aPbG15_bwe7drwHkO4xQ",
}
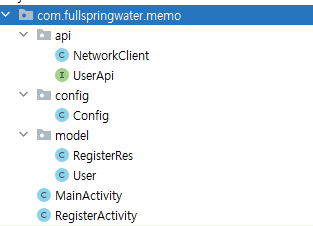
기본적으로 아래와 같은 식의 구성을 만들어 줍니다.

1.회원가입 화면 만들기
activity_register.xml
<?xml version="1.0" encoding="utf-8"?>
<androidx.constraintlayout.widget.ConstraintLayout xmlns:android="http://schemas.android.com/apk/res/android"
    xmlns:app="http://schemas.android.com/apk/res-auto"
    xmlns:tools="http://schemas.android.com/tools"
    android:layout_width="match_parent"
    android:layout_height="match_parent"
    tools:context=".RegisterActivity">

    <LinearLayout
        android:layout_width="match_parent"
        android:layout_height="match_parent"
        android:layout_margin="10dp"
        android:orientation="vertical"
        app:layout_constraintBottom_toBottomOf="parent"
        app:layout_constraintEnd_toEndOf="parent"
        app:layout_constraintStart_toStartOf="parent"
        app:layout_constraintTop_toTopOf="parent">

        <TextView
            android:id="@+id/textView"
            android:layout_width="match_parent"
            android:layout_height="wrap_content"
            android:layout_marginTop="30dp"
            android:gravity="center"
            android:text="회원가입"
            android:textSize="28sp" />

        <EditText
            android:id="@+id/editEmail"
            android:layout_width="match_parent"
            android:layout_height="wrap_content"
            android:layout_marginTop="30dp"
            android:ems="10"
            android:hint="이메일"
            android:inputType="textPersonName"
            android:textSize="28sp" />

        <EditText
            android:id="@+id/editPassword"
            android:layout_width="match_parent"
            android:layout_height="wrap_content"
            android:ems="10"
            android:hint="비밀번호"
            android:inputType="textPersonName"
            android:textSize="28sp" />

        <EditText
            android:id="@+id/editNickname"
            android:layout_width="match_parent"
            android:layout_height="wrap_content"
            android:ems="10"
            android:hint="닉네임"
            android:inputType="textPersonName"
            android:textSize="28sp" />

        <Button
            android:id="@+id/btnRegister"
            android:layout_width="match_parent"
            android:layout_height="wrap_content"
            android:layout_marginTop="50dp"
            android:text="회원가입"
            android:textSize="28sp" />
    </LinearLayout>
</androidx.constraintlayout.widget.ConstraintLayout>
2. model/User
회원가입과 관련있는 데이터는 User이기 때문에 User 클래스를 만들어줍니다.
package com.fullspringwater.memo.model;

import java.io.Serializable;

public class User implements Serializable {
    private String email;
    private String password;
    private String nickname;

    public User(String email, String password, String nickname) {
        this.email = email;
        this.password = password;
        this.nickname = nickname;
    }

    public String getEmail() {
        return email;
    }

    public void setEmail(String email) {
        this.email = email;
    }

    public String getPassword() {
        return password;
    }

    public void setPassword(String password) {
        this.password = password;
    }

    public String getNickname() {
        return nickname;
    }

    public void setNickname(String nickname) {
        this.nickname = nickname;
    }
}
3. model/RegisterRes
package com.fullspringwater.memo.model;

import java.io.Serializable;

public class RegisterRes implements Serializable {
    private String result;
    private String accessToken;

    public String getResult() {
        return result;
    }

    public void setResult(String result) {
        this.result = result;
    }

    public String getAccessToken() {
        return accessToken;
    }

    public void setAccessToken(String accessToken) {
        this.accessToken = accessToken;
    }
}
4. config/Config
package com.fullspringwater.memo.config;

public class Config {

    public static final String BASE_URL = "URL주소";
    public static final String TEST_URL = "TEST_URL 주소";
    public static final String PREFERENCES_NAME = "memo_app";
}
5. api/UserApi
@POST("/users/register")
: BASE_URL의 뒤에 오는 경로와 메소드를 지정해줍니다.
Call<RegisterRes> register(@Body User user)
: Body에 user 객체를 넘겨주고 반환은 RegisterRes 클래스의 형태로 줍니다.
package com.fullspringwater.memo.api;

import com.fullspringwater.memo.model.RegisterRes;
import com.fullspringwater.memo.model.User;

import retrofit2.Call;
import retrofit2.http.Body;
import retrofit2.http.POST;

public interface UserApi {

    @POST("/users/register")
    Call<RegisterRes> register(@Body User user);
}
6. api/NetworkClient
네트워크 통신할 retrofit 객체를 반환하는 역할을 합니다.
package com.fullspringwater.memo.api;

import android.content.Context;

import com.fullspringwater.memo.config.Config;

import java.util.concurrent.TimeUnit;

import okhttp3.OkHttpClient;
import okhttp3.logging.HttpLoggingInterceptor;
import retrofit2.Retrofit;
import retrofit2.converter.gson.GsonConverterFactory;

public class NetworkClient {

    public static Retrofit retrofit;

    public static Retrofit getRetrofitClient(Context context){
        if(retrofit == null){
            HttpLoggingInterceptor loggingInterceptor = new HttpLoggingInterceptor();
            loggingInterceptor.setLevel(HttpLoggingInterceptor.Level.BASIC);

            OkHttpClient httpClient = new OkHttpClient.Builder()
                    .connectTimeout(1, TimeUnit.MINUTES)
                    .readTimeout(1, TimeUnit.MINUTES)
                    .writeTimeout(1, TimeUnit.MINUTES)
                    .addInterceptor(loggingInterceptor)
                    .build();

            retrofit = new Retrofit.Builder().baseUrl(Config.BASE_URL)
                    .client(httpClient)
                    // 데이터를 주고 받을 때 클래스로 처리하겠다.
                    .addConverterFactory(GsonConverterFactory.create())
                    .build();
        }
        return retrofit;
    }
}
7. MainActivity
package com.fullspringwater.memo;

import androidx.appcompat.app.AppCompatActivity;

import android.content.Intent;
import android.content.SharedPreferences;
import android.os.Bundle;
import android.view.View;
import android.widget.Button;
import android.widget.EditText;

import com.fullspringwater.memo.config.Config;

public class MainActivity extends AppCompatActivity {


    @Override
    protected void onCreate(Bundle savedInstanceState) {
        super.onCreate(savedInstanceState);
        setContentView(R.layout.activity_main);

        // 1. 쉐어드 프리퍼런스에서 억세스토큰을 가져온다.
        SharedPreferences sp = getApplication()
                .getSharedPreferences(Config.PREFERENCES_NAME, MODE_PRIVATE);
        String accessToken = sp.getString("accessToken", "");

        // 2. 만약 억세스토큰이 없으면, 회원가입 액티비티를 실행하고,
        //    그렇지 않으면, 메모가져오는 API 호출해서, 리사이클러뷰로 화면에
        //    내 메모 보여준다.
        if(accessToken.isEmpty()){
            Intent intent = new Intent(MainActivity.this, RegisterActivity.class);
            startActivity(intent);
        }else{
            // todo : 내 메모 가져오는 api 호출
        }


    }
}
8. RegisterActivity
package com.fullspringwater.memo;

import androidx.appcompat.app.AppCompatActivity;

import android.app.ProgressDialog;
import android.content.SharedPreferences;
import android.os.Bundle;
import android.view.View;
import android.widget.Button;
import android.widget.EditText;
import android.widget.Toast;

import com.fullspringwater.memo.api.NetworkClient;
import com.fullspringwater.memo.api.UserApi;
import com.fullspringwater.memo.config.Config;
import com.fullspringwater.memo.model.RegisterRes;
import com.fullspringwater.memo.model.User;

import java.util.regex.Pattern;

import retrofit2.Call;
import retrofit2.Callback;
import retrofit2.Response;
import retrofit2.Retrofit;

public class RegisterActivity extends AppCompatActivity {
    EditText editEmail;
    EditText editPassword;
    EditText editNickName;
    Button btnRegister;

    // 네트워크 처리 보여주는 프로그레스 다이얼로그
    ProgressDialog dialog;

    @Override
    protected void onCreate(Bundle savedInstanceState) {
        super.onCreate(savedInstanceState);
        setContentView(R.layout.activity_register);

        editEmail = findViewById(R.id.editEmail);
        editPassword = findViewById(R.id.editPassword);
        editNickName = findViewById(R.id.editNickname);
        btnRegister = findViewById(R.id.btnRegister);
        btnRegister.setOnClickListener(new View.OnClickListener() {
            @Override
            public void onClick(View view) {
                // 이메일 가져온다. 이메일 형식체크
                String email = editEmail.getText().toString().trim();
                Pattern pattern = android.util.Patterns.EMAIL_ADDRESS;
                if(pattern.matcher(email).matches() == false){
                    Toast.makeText(RegisterActivity.this
                            , "이메일 형식이 올바르지 않습니다."
                            , Toast.LENGTH_SHORT).show();
                    return;
                }

                // 비밀번호 가져온다.
                String password = editPassword.getText().toString().trim();

                // 비밀번호 길이 체크
                if(password.length() < 4 || password.length() > 12){
                    Toast.makeText(RegisterActivity.this
                            , "비밀번호 길이는 4자 이상, 12자 이하로 만들어주세요."
                            , Toast.LENGTH_SHORT).show();
                    return;
                }

                // 닉네임을 가져와서, 빈 문자열인지만 체크
                String nickname = editNickName.getText().toString().trim();
                if(nickname.isEmpty()){
                    Toast.makeText(RegisterActivity.this, "닉네임 입력하세요.",
                            Toast.LENGTH_SHORT).show();
                    return;
                }

                // 이 데이터를 API로 호출
                // 네트워크 통해서 데이터를 보내고 있다는,
                // 프로그레스 다이얼로그를 먼저 띄운다.
                showProgress(getString(R.string.dialog_register));

                Retrofit retrofit = NetworkClient.getRetrofitClient(RegisterActivity.this);

                UserApi api = retrofit.create(UserApi.class);

                User user = new User(email, password, nickname);

                Call<RegisterRes> call = api.register(user);
                // 실제 api 호출
                call.enqueue(new Callback<RegisterRes>() {
                    @Override
                    public void onResponse(Call<RegisterRes> call, Response<RegisterRes> response) {
                        dismissProgress();

                        // 200 OK
                        if(response.isSuccessful()){
                            RegisterRes registerRes = response.body();

                            // 억세스토큰은, 이제 앱에서 api 호출할 때마다 헤더에 넣어서 보내야 한다.
                            // 따라서 억세스토큰은, 쉐어드 프리퍼런스에 저장해 놓는다.
                            SharedPreferences sp = getApplication().getSharedPreferences(Config.PREFERENCES_NAME, MODE_PRIVATE);
                            SharedPreferences.Editor editor = sp.edit();
                            editor.putString("accessToken", registerRes.getAccessToken());
                            editor.apply();

                            finish();

                        } else if(response.code() == 400){

                        } else{
                            Toast.makeText(RegisterActivity.this, "에러발생 : " + response.code(),
                                    Toast.LENGTH_SHORT).show();
                        }
                    }

                    @Override
                    public void onFailure(Call<RegisterRes> call, Throwable t) {
                        // 네트워크 자체 문제로 실패
                        dismissProgress();
                    }
                });


            }
        });
    }
    void showProgress(String message){
        dialog = new ProgressDialog(this);
        dialog.setProgressStyle(ProgressDialog.STYLE_SPINNER);
        dialog.setMessage(message);
        dialog.show();
    }

    void dismissProgress(){
        dialog.dismiss();
    }
}
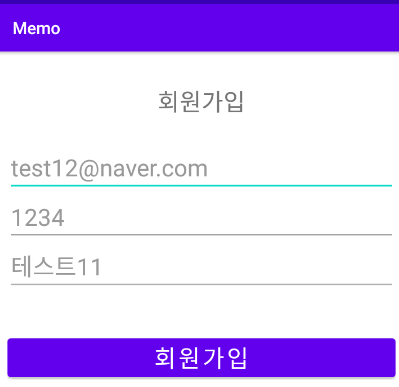
실행화면


해당 api의 데이터베이스에 추가된 모습

'Android' 카테고리의 다른 글
| [Android] Retrofit2 라이브러리 form-data 형식 파일, 텍스트 전송하기(Multipart form 이용) (0) | 2022.07.26 |
|---|---|
| [Android] Progress Dialog 프로그레스 다이얼로그 생성/제거 (0) | 2022.07.25 |
| [Android] Retrofit2 라이브러리 사용을 위한 설정 방법 (0) | 2022.07.21 |
| [Android] 카메라 / 앨범 처리 (0) | 2022.07.21 |
| [Android] 리사이클러뷰 스크롤 위치 찾기, 페이징 처리 (0) | 2022.07.20 |


