
Notice
Recent Posts
Recent Comments
Link
| 일 | 월 | 화 | 수 | 목 | 금 | 토 |
|---|---|---|---|---|---|---|
| 1 | 2 | 3 | 4 | 5 | 6 | 7 |
| 8 | 9 | 10 | 11 | 12 | 13 | 14 |
| 15 | 16 | 17 | 18 | 19 | 20 | 21 |
| 22 | 23 | 24 | 25 | 26 | 27 | 28 |
| 29 | 30 | 31 |
Tags
- DataFrame
- 분류 결과표
- data
- 최댓값
- analizer
- 덴드로그램
- string
- list
- pandas
- dendrogram
- count()
- hierarchical_clustering
- function
- Dictionary
- wcss
- insert()
- elbow method
- nan
- 반복문
- 최솟값
- len()
- numpy
- append()
- del
- sklearn
- Machine Learning
- IN
- matplotlib
- DataAccess
- Python
Archives
- Today
- Total
개발공부
[Android] 액티비티 간의 양방향 데이터 전달방법 본문
아래와 같은 객체 생성 코드를 추가한 후에 .launch(intent)를 하면 된다.
// 내가 실행한 액티비티로부터, 데이터를 받아와서 처리하는 코드
ActivityResultLauncher<Intent> startActivityResult =
        registerForActivityResult(new ActivityResultContracts.StartActivityForResult(),
                new ActivityResultCallback<ActivityResult>() {
                    @Override
                    public void onActivityResult(ActivityResult result) {
                        // result에는 resultCode가 있다.
                        // resultCode의 값으로, 여러가지구분해서 사용이 가능,
                        if(result.getResultCode() == 0){
                            int age = result.getData().getIntExtra("age", 0);
                            editAge.setText(""+age);
                        }
                    }
});startActivityResult.launch(intent);Intent.putExtra()
key, value 형식으로 데이터를 다음 액티비티로 보낼 수 있다.
getIntent()
보낸 intent 객체를 반환한다.
getIntent().getStringExtra(name);
String 형식의 name의 값을 반환한다.
getIntent().getIntExtra(name, default);
Int 형식의 name 값을 반환한다.
값이 존재하지 안으면 default값을 반환한다.
예제
AndroidManifest.xml
<?xml version="1.0" encoding="utf-8"?>
<manifest xmlns:android="http://schemas.android.com/apk/res/android"
    xmlns:tools="http://schemas.android.com/tools"
    package="com.fullspringwater.data">

    <application
        android:allowBackup="true"
        android:dataExtractionRules="@xml/data_extraction_rules"
        android:fullBackupContent="@xml/backup_rules"
        android:icon="@mipmap/ic_launcher"
        android:label="@string/app_name"
        android:roundIcon="@mipmap/ic_launcher_round"
        android:supportsRtl="true"
        android:theme="@style/Theme.Data"
        tools:targetApi="31">
        <activity
            android:name=".SecondActivity"
            android:exported="false" />
        <activity
            android:name=".MainActivity"
            android:exported="true">
            <intent-filter>
                <action android:name="android.intent.action.MAIN" />

                <category android:name="android.intent.category.LAUNCHER" />
            </intent-filter>
        </activity>
    </application>

</manifest>
activity_main.xml
<?xml version="1.0" encoding="utf-8"?>
<androidx.constraintlayout.widget.ConstraintLayout xmlns:android="http://schemas.android.com/apk/res/android"
    xmlns:app="http://schemas.android.com/apk/res-auto"
    xmlns:tools="http://schemas.android.com/tools"
    android:layout_width="match_parent"
    android:layout_height="match_parent"
    tools:context=".MainActivity">


    <LinearLayout
        android:layout_width="match_parent"
        android:layout_height="match_parent"
        android:orientation="vertical"
        app:layout_constraintBottom_toBottomOf="parent"
        app:layout_constraintEnd_toEndOf="parent"
        app:layout_constraintStart_toStartOf="parent"
        app:layout_constraintTop_toTopOf="parent">

        <EditText
            android:id="@+id/editEmail"
            android:layout_width="match_parent"
            android:layout_height="wrap_content"
            android:ems="10"
            android:inputType="text"
            android:hint="이메일"
            android:textSize="30sp" />

        <EditText
            android:id="@+id/editName"
            android:layout_width="match_parent"
            android:layout_height="wrap_content"
            android:ems="10"
            android:inputType="text"
            android:hint="이름"
            android:textSize="30sp" />

        <EditText
            android:id="@+id/editAge"
            android:layout_width="match_parent"
            android:layout_height="wrap_content"
            android:ems="10"
            android:inputType="number"
            android:hint="나이"
            android:textSize="30sp" />

        <Button
            android:id="@+id/button"
            android:layout_width="match_parent"
            android:layout_height="wrap_content"
            android:text="Button" />

    </LinearLayout>
</androidx.constraintlayout.widget.ConstraintLayout>
MainActivity.java
package com.fullspringwater.data;

import androidx.activity.result.ActivityResult;
import androidx.activity.result.ActivityResultCallback;
import androidx.activity.result.ActivityResultLauncher;
import androidx.activity.result.contract.ActivityResultContracts;
import androidx.appcompat.app.AppCompatActivity;

import android.content.Intent;
import android.os.Bundle;
import android.view.View;
import android.widget.Button;
import android.widget.EditText;

public class MainActivity extends AppCompatActivity {

    EditText editEmail;
    EditText editName;
    EditText editAge;
    Button button;

    // 내가 실행한 액티비티로부터, 데이터를 받아와서 처리하는 코드
    ActivityResultLauncher<Intent> startActivityResult =
            registerForActivityResult(new ActivityResultContracts.StartActivityForResult(),
                    new ActivityResultCallback<ActivityResult>() {
                        @Override
                        public void onActivityResult(ActivityResult result) {
                            // result에는 resultCode가 있다.
                            // resultCode의 값으로, 여러가지구분해서 사용이 가능,
                            if(result.getResultCode() == 0){
                                int age = result.getData().getIntExtra("age", 0);
                                editAge.setText(""+age);
                            }
                        }
                    });

    @Override
    protected void onCreate(Bundle savedInstanceState) {
        super.onCreate(savedInstanceState);
        setContentView(R.layout.activity_main);

        editEmail = findViewById(R.id.editEmail);
        editName = findViewById(R.id.editName);
        editAge = findViewById(R.id.editAge);
        button = findViewById(R.id.button);

        button.setOnClickListener(new View.OnClickListener() {
            @Override
            public void onClick(View view) {

                String email = editEmail.getText().toString().trim();
                String name = editName.getText().toString().trim();
                String ageStr = editAge.getText().toString().trim();

                int age = Integer.parseInt(ageStr);

                double hiddenData = 3.1414;

                // 새로운 액티비티를 띄우고,
                // 데이터를 전달한다.

                Intent intent = new Intent(MainActivity.this, SecondActivity.class);
                // 데이터를 key, value 형식으로 보낸다.
                intent.putExtra("email", email);
                intent.putExtra("name", name);
                intent.putExtra("age", age);
                intent.putExtra("hiddenData", hiddenData);

                // 데이터만 전달하는 경우
//                startActivity(intent);
                // 실행한 액티비티로부터 데이터를 받아오는 것이 있는 경우
                startActivityResult.launch(intent);
            }
        });
    }
}
activity_second.xml
<?xml version="1.0" encoding="utf-8"?>
<androidx.constraintlayout.widget.ConstraintLayout xmlns:android="http://schemas.android.com/apk/res/android"
    xmlns:app="http://schemas.android.com/apk/res-auto"
    xmlns:tools="http://schemas.android.com/tools"
    android:layout_width="match_parent"
    android:layout_height="match_parent"
    tools:context=".SecondActivity">

    <LinearLayout
        android:layout_width="match_parent"
        android:layout_height="match_parent"
        android:orientation="vertical"
        app:layout_constraintBottom_toBottomOf="parent"
        app:layout_constraintEnd_toEndOf="parent"
        app:layout_constraintStart_toStartOf="parent"
        app:layout_constraintTop_toTopOf="parent">

        <TextView
            android:id="@+id/txtEmail"
            android:layout_width="match_parent"
            android:layout_height="wrap_content"
            android:text="TextView"
            android:textSize="30sp" />

        <TextView
            android:id="@+id/txtName"
            android:layout_width="match_parent"
            android:layout_height="wrap_content"
            android:text="TextView"
            android:textSize="30sp" />

        <EditText
            android:id="@+id/editAge"
            android:layout_width="match_parent"
            android:layout_height="wrap_content"
            android:ems="10"
            android:inputType="number"
            android:hint="나이"
            android:textSize="30sp" />

        <Button
            android:id="@+id/button"
            android:layout_width="match_parent"
            android:layout_height="wrap_content"
            android:text="Button"
            android:textSize="30sp" />
    </LinearLayout>
</androidx.constraintlayout.widget.ConstraintLayout>
SecondActivity.java
package com.fullspringwater.data;

import androidx.appcompat.app.AppCompatActivity;

import android.content.Intent;
import android.os.Bundle;
import android.view.View;
import android.widget.Button;
import android.widget.EditText;
import android.widget.TextView;

public class SecondActivity extends AppCompatActivity {

    TextView txtEmail;
    TextView txtName;
    EditText editAge;
    Button button;

    @Override
    protected void onCreate(Bundle savedInstanceState) {
        super.onCreate(savedInstanceState);
        setContentView(R.layout.activity_second);

        // 넘어오는 데이터가 있으면 처리 해준다.
        String email = getIntent().getStringExtra("email");
        String name = getIntent().getStringExtra("name");
        int age =getIntent().getIntExtra("age", 0);
        double hiddenData = getIntent().getDoubleExtra("hidden", 0);

        // 화면과 연결
        txtEmail = findViewById(R.id.txtEmail);
        txtName = findViewById(R.id.txtName);
        editAge = findViewById(R.id.editAge);
        button = findViewById(R.id.button);

        // 데이터를 화면에 셋팅
        txtEmail.setText(email);
        txtName.setText(name);
        editAge.setText(""+age);


        // 버튼 이벤트 처리
        button.setOnClickListener(new View.OnClickListener() {
            @Override
            public void onClick(View view) {

                // 1. 수정한 나이 데이터를 가져온다.
                int age = Integer.parseInt(editAge.getText().toString().trim());
                // 이 나이 데이터를 MainActivity에 전달한다.
                Intent intent = new Intent();
                intent.putExtra("age", age);
                setResult(0, intent);
                // 3. 이 액티비티는 종료한다.
                finish();

            }
        });
    }
}
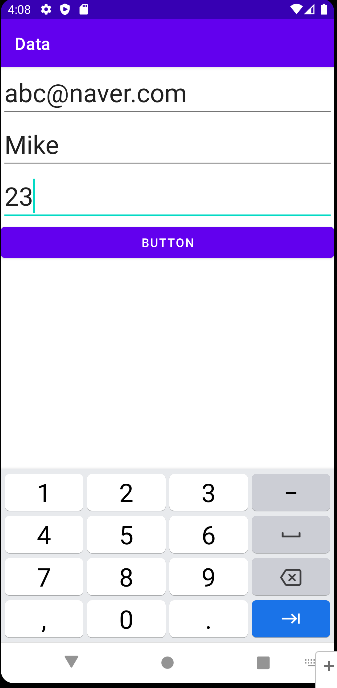
실행화면
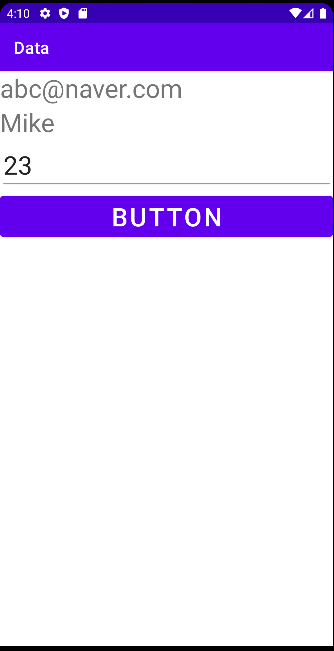
버튼 누른 후
다른 나이 값 입력
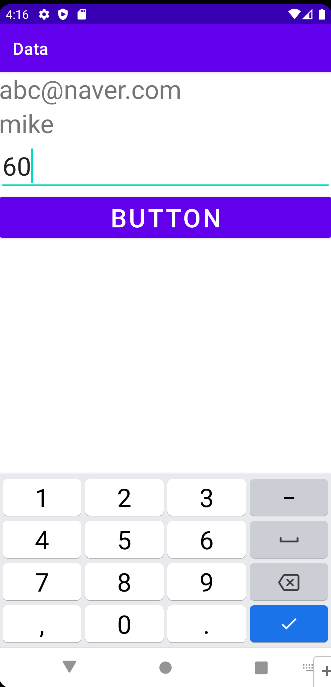
버튼 누른 후

'Android' 카테고리의 다른 글
| [Android] SQLite 데이터베이스 활용하는 방법 (0) | 2022.07.18 |
|---|---|
| [Android] 데이터 저장, 불러오기 SharedPreferences (0) | 2022.07.13 |
| [Android] 액티비티 간의 단방향 데이터 전달 방법. Serializable, putExtra(), getSerializableExtra() (0) | 2022.07.13 |
| [Android] 이메일 형식 체크하는 코드 (0) | 2022.07.13 |
| [Android] 액티비티 간의 화면 전환 방법, 라이프 사이클 함수 순서 (0) | 2022.07.13 |
'Android' Related Articles
more


